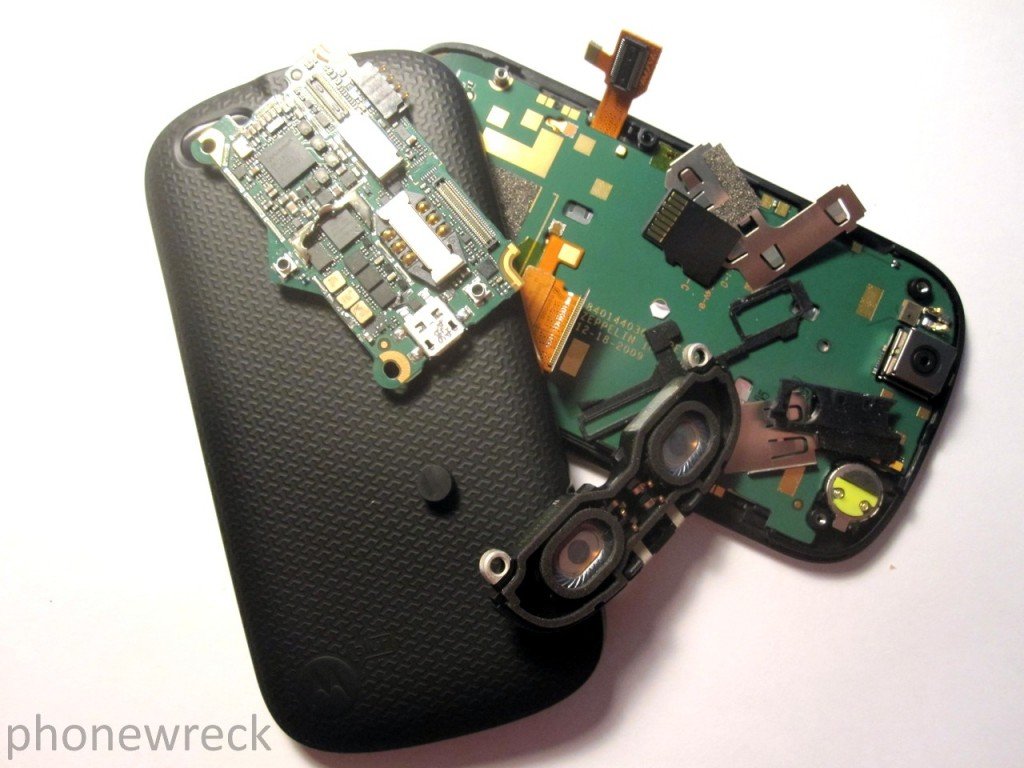
Howdy, today at Phonewreck we’re bringing you all the gory details regarding the Motorola Cliq XT. For those not in the know, this device is the evolution/alternative to OG Cliq. Differences lie in the lack of keyboard and OA thickness. The XT is just a little bit taller and wider than the original Cliq.

Small PCB Design
As you can see above, the PCB is INCREDIBLY small. In fact, for a “full” featured and relatively modern smartphone, it’s the smallest we’ve ever seen. More on that design later.
Disassembly Steps
Removing the Screws
This reveals 6 T6 hex screws holding in the plastic chassis and antennae. Notice the sticker-based antennae system at the bottom rear of the device. Remove these screws and take note of the locations of the silver and black screws. The thread density is different on each, and they’ll need to go in the same place they came out.
Prying the Chassis
The next step is to pry away the black plastic chassis piece which holds the power, volume, and camera buttons. This can be done by carefully prying with a fingernail and then pulling away from the clips with minimal force. Don’t break the clips!
Exposing the PCB
Fantastic – the PCB is right in front of you and only held in via a few flex clips. Pop these away with a fingernail, spudger, or staple remover.
Analyzing the PCB
Now if you have some time, reflect on the size of the PCB. Compare it to your SD, SIM card, the iPhone 4 PCB, or the Galaxy S. Sure, these devices are more feature-packed but Motorola surely has made a statement about PCB design here.
Warning to the wise: ESD cans are soldered (not soldered AND epoxied thank-God) to the main logic board. They can be loosened/removed with a heat gun/iron. Be careful though… inexperience with these tools can write off the device.
And that’s it. From here you can remove the Antenna block and Screen module via simple pokes and prods. What we’re really interested in is what powers this device. How can the PCB be so small? What kind of integrated mastery is taking place here?
Components and Specs
Qualcomm MSM 7200A
Ahah! It’s the MSM 7200A. Holy moley, we saw this device in the original Xperia! Talk about product line longevity! We assumed this puppy was EOL’d long ago.
That’s not to say it isn’t a solid device. It does a seemingly good job of powering the Cliq XT, a handset we’d consider in the “economy” category when it comes to smartphones.
The Qualcomm MSM7200A integrates GPS and Audio Codec into the Baseband and Applications core. This eliminates ~4 devices off of the main logic board. Is this a good design? Well, the sheer quantity of processing power takes a hit, but it’s a perfectly fine low-cost design decision for the Cliq XT.
Other Key Components
As we often see, PMIC and Transceiver pairing went to Qcomm with the popular PM7590 and RTR6285 reference design. Why mess with what works?
The memory win went to Toshiba with its footprint-friendly TYBC0A111107LC MCP SDRAM + NAND package. This removes three additional IC’s from the board when compared to other, more expensive devices.
Wi-Fi/Bluetooth/FM is handled via Broadcomm with its every popular BCM integrated series, the BCM4325FKUBG on this device to be exact.
Looks like the USB PHY win goes to SMSC with the USB3326 and Motorola tops this device off with its BQ6X 3.7V 1420mAh battery.
Final Thoughts
That’s it, that’s all – an interesting device, definitely built with economy in mind.
Is reducing the size of a device the current trend? It’s hard to believe with devices like the EVO on the market – touch screen interfaces really do work better with bigger screens. One thing for sure, we should see a cost/weight reduction in future smartphones… well, probably not cost, but definitely in weight.
Be sure to leave any questions or comments below!
Keep Wrecking!